Flash - Using flash creatively
Flash lighting is a huge topic. We can discuss everything from a tiny built-in camera flash to complex light banks to light a car or even a larger object. Often flash is combined with ambient light and the goal is to do so in such a way where the use of flash appears natural. That is always the goal, making the use of artificial lighting to appear more natural. Simple built-in Camera flash
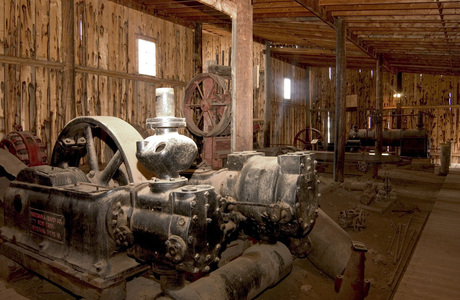
The most common way people use flash is also is also the least creative and the least flattering. Need flash? Turn it on, and shoot. Never mind the shiny faces, the shadows growing out of the subject, and the dark underexposed background. Imagine in the shot (left) if I had not balanced the window light with the flash. We would be left with an over exposed image of a black pump and a unlit black room rather than shot that appears evenly light. This shot was done using one flash, so you do not need a complex setup to light the shot.
So what can be done with a simple on camera flash to make it more pleasing? Not a lot but there are some things you can try and some may work well.
Off Camera Flash
The good news is that you can always purchase an off camera flash to add light to your shots. This can be an easy and inexpensive way to improve your flash shots. You will need a flash, a way to mount it so it is supported, and a way to trigger it.
Triggering your off camera flash. The easiest way is to have the in camera flash trigger and even control the off camera flash or slave. You can even have the in camera flash trigger only and not fire. There are many options but the easiest is to buy a dedicated flash that will sync automatically with your camera and do TTL. This allows you to control the flash without knowing much about it.
This however is not the cheapest option as dedicated flashes are brand and model specific. There are plenty of generic flashes, like sunpak, that work well even if you have to understand what you're doing.
Most flashes come with a platform so you can set them on a table or a nightstand. Most flashes have tilt and swivel which allows one to take advantage of bounce capabilities.
Bouncing a Flash
When you bounce a flash you are pointing the flash at a white surface like the ceiling or wall and aiming the light at a 45 degree angle towards the subject. The flash bounces off the surface and is diffused. This produces a even light without harsh shadows. If you are shooting in an area without a white ceiling or wall, another way to accomplish the bounce is to attach a product like the Lumiquest Big Bounce diffuser to your flash. This product attaches to a flash so that the head is pointed up. The flash is then reflected into a diffuser which reflects the light towards the subject. The light is not as diffused as a ceiling bounce, but it works very well. The Big Bounce diffuser also allows one to bounce the majority of the light off a ceiling but have a portion directed by the diffuser directly at the subject. There are many ways to diffuse and bounce light. Look around the room you are shooting in and see what can be accomplished.
Dedicated Flash TTL vs Manual vs Automatic Flash modes
We like our flashes to be dedicated where we don't need to do much thinking and everything works out nicely. But that is not always the case for many reasons. Lets look at the automation options as once you understand a bit about flash the automatic and manual options are not difficult to use. We will start with fully dedicated TTL.
Dedicated TTL Flash
What is TTL exactly? It stands for Through The Lens. The camera has flash sensors near the main sensor that detect flash and shut it down when enough light has reached the flash sensor. This is not a fool proof system but it works in the majority of situations. This process can be rather complex so we shall stick with the basics of what and not so much how. As light travels quickly, a flash can fire a number of pre flashes to determine how far away the subjects are, and how much light is needed. It can also fire pre flashes telling other flashes how much light they will need to produce, cool huh! Flashes can fire a number of pre flashes that we do not see and they happen at the speed of light. Once the flashes have determined how much light is required they then fire the exposure flash. This entire process takes milliseconds. What will take more time is for the flash to recharge.
With dedicated flash we can set exposure ratios without really understanding what we are doing. For example we can tell the camera we want the built in flash to expose at -1 stops, and the off camera flash to expose at 0 stops providing a 2:1 flash ratio. IOW's there is twice the power on the main light. But the photographer may understand little about the settings, all they need to know is to point the off camera flash correctly. Chances are they know exactly what they are doing, but the beauty of it is they don't need to. With the complex nature of dedicated flash exposure it is enough for photographers to understand what they are doing without understanding how exactly it is accomplished. If one needs to know more about the mechanics behind flash control the manufactures site is a good source for the technical info.
Dedicated flash works very well in a large majority of the situations one needs for lighting. The Nikon CLS system can control a number of dedicated flashes. Granted most studio multiple flash setups will not be using dedicated Nikon flash control, but it's nice to know it works well. Canon offers similar technology using their E-TTL system.
Automatic Flash
Automatic flash means that the flash will shut down when a certain amount is detected. Say the subject is 8' away and needs f8 light. If the flash is setup correctly the flash will produce f8 light at 8'. This will work at 1' through the point the flash is firing full power and not producing enough light. Auto mode uses external sensors on the flash and can be fooled by highly reflective or black subjects. The best way to determine what setting to use is a hand held flash meter.
Manual Flash
Manual flash is exactly what it sounds like. You set the flash power between full power and 1/64 power, and shoot away. Flash settings are generally Full-1/2-1/4-1/8-1/16-1/32-1/64. If the distance between the camera and subject changes the output needs to be adjusted. If the aperture changes the flash requires adjustment. Manual flash is great as long as you have a fixed distance between the camera and subject. A good application for a manual setting is in the studio.
Light Temperature
The temperature of light, or color temperature, varies based on the time of day when shooting in sunlight, and the light source when shooting under a artificial light source like a street light. The temperature of light is measured in Kelvin. Below is a list of some color temperature values and the type of light that produces each value or range. As color temperature varies the values below are common but not exact in many cases.
2,700–3,300 K Incandescent light bulb
3,000 K Cool White/Soft White compact florescent light bulb
3,200 K Studio lamps, photofloods, etc.
3,350 K Studio "CP" light
4,100–4,150 K Moonlight, [2] xenon arc lamp
5,000 K Horizon daylight
5,000 K Florescent light tubes or Cool White/Daylight compact florescent light bulb
5,500–6,000 K Vertical daylight, electronic flash
6,500 K Daylight, overcast
6,500–9,300 K LCD or CRT screen
As shown above Daylight ranges from 5000-6500K with the lower end of the spectrum being sunrise or sunset and the upper end representing an overcast sky. Tungsten bulbs fall into the 2700-3350k range and record brownish on daylight film. There is an Incandescent setting which works well for tungsten bulbs. Florescent light shows up as green on daylight film. There is no florescent White Balance setting so doing a custom setting maybe worth a shot. Moonlight, which is reflected sunlight, shows up with a red tone on daylight film and the standard daylight setting works well. Color Temperature is a slippery concept as daylight has a range, and artificial light may not maintain a constant temperature. There are color light meters, and ways to determine the temperature of light, but sometimes reviewing results and practice is a good approach.
White Balance Selection
There are many options when setting the white balance. There is Auto White Balance, Daylight, Cloudy, Shade, Incandescent, Flash, Underwater, and selected custom options. Setting the WB to Auto and leaving it alone works on many cameras but changing the WB to match the light your shooting under is sometimes preferable.
The most common way people use flash is also is also the least creative and the least flattering. Need flash? Turn it on, and shoot. Never mind the shiny faces, the shadows growing out of the subject, and the dark underexposed background. Imagine in the shot (left) if I had not balanced the window light with the flash. We would be left with an over exposed image of a black pump and a unlit black room rather than shot that appears evenly light. This shot was done using one flash, so you do not need a complex setup to light the shot.
So what can be done with a simple on camera flash to make it more pleasing? Not a lot but there are some things you can try and some may work well.
- Maximize the light in the room. Turn on more lights. Get closer to a window or light source or open the curtains. Sometimes simple obvious solutions are ignored. Anything you can do to increase the ambient light in the room will help.
- Shoot near reflective surfaces like a wall. Your camera may have a bounce capability, or not. Regardless, positioning the subject closer to the wall will help reflect light.
- Up the ISO. Most PnS models have very poor high ISO performance, but you can certainly try. Do some test shots to see where your cameras image falls apart (grain/loss of detail). Remember the quality needed for a 3x5 shot on the web is low compared to printing an 11x14 for example. So if you have reasonable performance at ISO 400 how many stops of light have you gained vs. shooting at ISO 100?
- Modify the flash output. Tape a white index card to the bottom of the flash to direct the light at the ceiling. This works best with white low ceilings, and use a white index card or something similar. This may not work at all as the flash may not have the power, so try it out before shooting anything memorable.
- Buy a flash modifier. B&H photo sells hundreds of flash modifiers. Here is one for compact cameras but look around, there is likely something made just for your camera. http://www.bhphotovideo.com/c/product/706801-REG/Gary_Fong_PUF_SONY_Puffer_Pop_Up_Flash.html
Off Camera Flash
The good news is that you can always purchase an off camera flash to add light to your shots. This can be an easy and inexpensive way to improve your flash shots. You will need a flash, a way to mount it so it is supported, and a way to trigger it.
Triggering your off camera flash. The easiest way is to have the in camera flash trigger and even control the off camera flash or slave. You can even have the in camera flash trigger only and not fire. There are many options but the easiest is to buy a dedicated flash that will sync automatically with your camera and do TTL. This allows you to control the flash without knowing much about it.
This however is not the cheapest option as dedicated flashes are brand and model specific. There are plenty of generic flashes, like sunpak, that work well even if you have to understand what you're doing.
Most flashes come with a platform so you can set them on a table or a nightstand. Most flashes have tilt and swivel which allows one to take advantage of bounce capabilities.
Bouncing a Flash
When you bounce a flash you are pointing the flash at a white surface like the ceiling or wall and aiming the light at a 45 degree angle towards the subject. The flash bounces off the surface and is diffused. This produces a even light without harsh shadows. If you are shooting in an area without a white ceiling or wall, another way to accomplish the bounce is to attach a product like the Lumiquest Big Bounce diffuser to your flash. This product attaches to a flash so that the head is pointed up. The flash is then reflected into a diffuser which reflects the light towards the subject. The light is not as diffused as a ceiling bounce, but it works very well. The Big Bounce diffuser also allows one to bounce the majority of the light off a ceiling but have a portion directed by the diffuser directly at the subject. There are many ways to diffuse and bounce light. Look around the room you are shooting in and see what can be accomplished.
Dedicated Flash TTL vs Manual vs Automatic Flash modes
We like our flashes to be dedicated where we don't need to do much thinking and everything works out nicely. But that is not always the case for many reasons. Lets look at the automation options as once you understand a bit about flash the automatic and manual options are not difficult to use. We will start with fully dedicated TTL.
Dedicated TTL Flash
What is TTL exactly? It stands for Through The Lens. The camera has flash sensors near the main sensor that detect flash and shut it down when enough light has reached the flash sensor. This is not a fool proof system but it works in the majority of situations. This process can be rather complex so we shall stick with the basics of what and not so much how. As light travels quickly, a flash can fire a number of pre flashes to determine how far away the subjects are, and how much light is needed. It can also fire pre flashes telling other flashes how much light they will need to produce, cool huh! Flashes can fire a number of pre flashes that we do not see and they happen at the speed of light. Once the flashes have determined how much light is required they then fire the exposure flash. This entire process takes milliseconds. What will take more time is for the flash to recharge.
With dedicated flash we can set exposure ratios without really understanding what we are doing. For example we can tell the camera we want the built in flash to expose at -1 stops, and the off camera flash to expose at 0 stops providing a 2:1 flash ratio. IOW's there is twice the power on the main light. But the photographer may understand little about the settings, all they need to know is to point the off camera flash correctly. Chances are they know exactly what they are doing, but the beauty of it is they don't need to. With the complex nature of dedicated flash exposure it is enough for photographers to understand what they are doing without understanding how exactly it is accomplished. If one needs to know more about the mechanics behind flash control the manufactures site is a good source for the technical info.
Dedicated flash works very well in a large majority of the situations one needs for lighting. The Nikon CLS system can control a number of dedicated flashes. Granted most studio multiple flash setups will not be using dedicated Nikon flash control, but it's nice to know it works well. Canon offers similar technology using their E-TTL system.
Automatic Flash
Automatic flash means that the flash will shut down when a certain amount is detected. Say the subject is 8' away and needs f8 light. If the flash is setup correctly the flash will produce f8 light at 8'. This will work at 1' through the point the flash is firing full power and not producing enough light. Auto mode uses external sensors on the flash and can be fooled by highly reflective or black subjects. The best way to determine what setting to use is a hand held flash meter.
Manual Flash
Manual flash is exactly what it sounds like. You set the flash power between full power and 1/64 power, and shoot away. Flash settings are generally Full-1/2-1/4-1/8-1/16-1/32-1/64. If the distance between the camera and subject changes the output needs to be adjusted. If the aperture changes the flash requires adjustment. Manual flash is great as long as you have a fixed distance between the camera and subject. A good application for a manual setting is in the studio.
Light Temperature
The temperature of light, or color temperature, varies based on the time of day when shooting in sunlight, and the light source when shooting under a artificial light source like a street light. The temperature of light is measured in Kelvin. Below is a list of some color temperature values and the type of light that produces each value or range. As color temperature varies the values below are common but not exact in many cases.
2,700–3,300 K Incandescent light bulb
3,000 K Cool White/Soft White compact florescent light bulb
3,200 K Studio lamps, photofloods, etc.
3,350 K Studio "CP" light
4,100–4,150 K Moonlight, [2] xenon arc lamp
5,000 K Horizon daylight
5,000 K Florescent light tubes or Cool White/Daylight compact florescent light bulb
5,500–6,000 K Vertical daylight, electronic flash
6,500 K Daylight, overcast
6,500–9,300 K LCD or CRT screen
As shown above Daylight ranges from 5000-6500K with the lower end of the spectrum being sunrise or sunset and the upper end representing an overcast sky. Tungsten bulbs fall into the 2700-3350k range and record brownish on daylight film. There is an Incandescent setting which works well for tungsten bulbs. Florescent light shows up as green on daylight film. There is no florescent White Balance setting so doing a custom setting maybe worth a shot. Moonlight, which is reflected sunlight, shows up with a red tone on daylight film and the standard daylight setting works well. Color Temperature is a slippery concept as daylight has a range, and artificial light may not maintain a constant temperature. There are color light meters, and ways to determine the temperature of light, but sometimes reviewing results and practice is a good approach.
White Balance Selection
There are many options when setting the white balance. There is Auto White Balance, Daylight, Cloudy, Shade, Incandescent, Flash, Underwater, and selected custom options. Setting the WB to Auto and leaving it alone works on many cameras but changing the WB to match the light your shooting under is sometimes preferable.
