Composition

Intro to Composition
Composition is how you decide what is included in your image, and just as important what is not. It also means making some decisions about how to compose the image. Shooting horizontally or vertically, getting closer to the subject or further away, even the lens selection, ISO, and aperture selection goes into your decisions on how to compose a frame.
Some folks shoot 100's of images in every possible way they can think of, and then decide on whats best after the fact. Some photographers spend hours setting up and shooting a handful of images. Digital photography has made the shooting process so easy that many photographers never think about what they are trying to capture, and what message are they trying to convey. I would encourage folks to put some thought into their images.
A famous photographer limited his shooting to one shot a day for a period of a month. Not just one setup, but one shot, or one frame. This forced him to really think about what he wanted to say to his audience, and how to compose his image. Remember he got one take, no more. Maybe he just wanted some time off! I do not suggest you try this exercise as for most it would be an exercise in madness. However I would think about this approach as you are pounding away at the shutter!
Remember these rules are just guidelines. As my photography teacher used to say, learn the rules then you can successfully break them.
Shooting Vertically or Horizontally
A decision on if to shoot vertically or horizontally is usually easy. The general rule is if the subject is taller than it is wide than shoot vertically. If the subject is wider than it is tall shoot horizontally. In the shot above of the Blue Hole, the subject is framed so the Hole appears wider than it is tall. In this case a horizontal image works. As the Blue Hole is roughly circular I could have framed it vertically and made that work as I did below.

The Rule of Thirds
The rule of thirds works regardless of if the image is composed horizontally or vertically. If you were to draw a grid on your image which divided the image in thirds both horizontally and vertically, placing your subject and points of interest on the intersections makes for good composition.
Many cameras have the ability to superimpose grid lines over a live preview or the playback screen. Each camera is different so check the manual, but this can be a useful feature especially if you can use it to compose your shots.
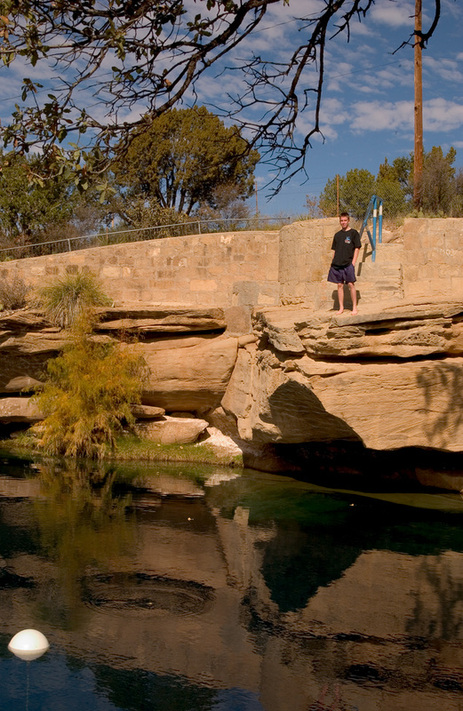
In the image to the left Brock is standing approximately two thirds of the way up, and two thirds to the right in the image. The sky occupies the top third of the image, the rocks the middle third, and the water occupies the bottom third of the image. Actually Brock did little, and I chose the composition. The composition is natural, but I did it this way with a purpose, using the rule of thirds. If you start looking more closely you will see many images are composed using the rule of thirds.
If you find your images follow the rule of thirds but you never gave it much thought that's good. If you are struggling to make good images and you images rarely follow the rule of thirds maybe it's time to start using this practice.
Balancing Elements
Placing your main subject off-centre, as with the rule of thirds, creates a more interesting photo, but it can leave a void in the scene which can make it feel empty. You should balance the "weight" of your subject by including another object of lesser importance to fill the space. This usually applies when the subject is surrounded by space like a sign in the desert.
Viewpoint
Before photographing your subject, take time to think about where you will shoot it from. Our viewpoint has a large impact on the composition of the photo. Rather than just shooting from eye level, consider photographing from above, at ground level, from the side, from the back, from a distance, or from very close up. As we are shooting digitally start by shooting from as many different viewpoints as possible. In time you may have a sense of what works, but it's never a bad idea to experiment.
Leading lines
When we look at a photo our eye is naturally drawn along lines. By thinking about how you place lines in your composition, you can affect the way we view the image, pulling us into the picture, towards the subject, or on a journey "through" the scene. There are many different types of line - straight, diagonal, curvy, zigzag, radial etc - and each can be used to enhance the photo's composition.
Background
How many times have you taken what you thought would be a great shot, only to find that the final image lacks impact because the subject blends into a busy background? Or there is a head peering out, or an electrical cord featured. The human eye is excellent at distinguishing between different elements in a scene, whereas a camera has a tendency to flatten the foreground and background, and this can ruin an otherwise great photo. Thankfully this problem is often easy to overcome at the time of shooting - look around for a plain and unobtrusive background and compose your shot so that it doesn't distract or detract from the subject. Often just changing the angle you are shooting from solves the issue. The key is recognizing the problem while it's happening and when you can do something about it.
Experimentation
With the dawn of the digital age we no longer have to worry about processing costs or running out of shots, unless we forget to clear a memory card.... Doh! Experimentation is a reality and there is no downside. If you do not like the results delete them. Try out different angles, various lens combination's, different aperture settings even various ISO's to see what works. The time to do this may not be at your sisters wedding, but Experimentation is worth exploring.
Depth of Field (DOF)
DOF is a function of the focal length of the lens you using along with the aperture you select. Wide lenses have a lot of DOF where a super telephoto has very little DOF. The term "Depth of Field" describes the range in a photograph, from near to far, that appears to be in focus.
Back in the day lenses had DOF scales built in so you could use the proper focus to obtain the desired DOF. For whatever reason those scales have mostly disappeared from 35mm type lenses, so we either have to guess, or print out a scale and carry that around. I have no idea why manufactures have stopped putting DOF scales on lenses but I would love to see this practice begin again.
Hyperfocal Distance
Definition: The hyperfocal distance is the closest distance at which a lens can be focused while keeping objects at infinity acceptably sharp. When the lens is focused at this distance, all objects at distances from half of the hyperfocal distance out to infinity will be acceptably sharp.
I used my DOF scales on my Hasselblad equipment all the time when shooting landscapes. I used it on my 35mm equipment if it had it. The DOF scales are very useful rather than guessing but I will provide a couple of scales and there are plenty of the web. Print out the ones you may need and put then in you wallet or camera bag.
One of the laws of optics is that the DOF extends from 1/3rd in front of the point focused on, to 2/3rds behind it. In other words, you have twice as much DOF behind your point of focus than in front of it. Given that info one can guestimate a focus point to maximize the DOF in a composition.
Hyperfocal distance and maximizing the DOF are things a landscape photographer finds desirable as it allows maximum DOF in an image.
Some lenses have a great amount of DOF even at fast apertures. In fact on small sensor cameras the DOF is generally too great making it difficult to isolate the subject. Ironically this is such an issue that 4/3 shooters often go for maximum blur to the determent of the image.
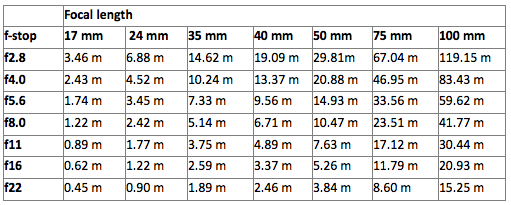
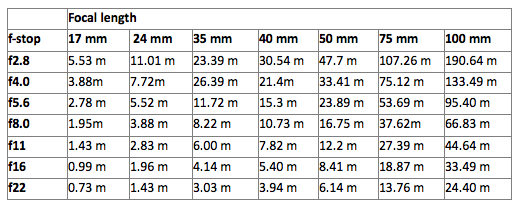
Above is the 35mm Hyperfocal chart.
Above is the reference for a 1.6 factor Hyperfocal chart.
Here is a handy DOF calculator as its not practical to print out every combination.
http://johndudak.com/photographers/dof.php
Here is a handy DOF calculator as its not practical to print out every combination.
http://johndudak.com/photographers/dof.php
